This text is motivated by a question from a friend in my FB group Dolomites Visitors Hub. He was thinking of making a Y-lanyard for ferrata. I told him this was not a good idea.
Trying to DIY a via ferrata lanyard is dangerous because homemade knots and friction plates often fail to replicate the exact dynamic tearing or friction needed to keep impact forces under safe limits (below 6 kN).
You would need a specific metal element, a friction plate (or klettersteig brake plate). In the outdoor industry, it is most commonly referred to by its generic manufacturing name: the Kong Kisa plate (or simply a KISA plate, which stands for Klettersteig-Stoßdämpfer-Automat in German).
The picture below shows it in my old Y-lanyard which I retired after years in use. I am showing it to let you know that if you try to make your own ferrata lanyard, it should follow the same general shape:

However, you have to create bulky knots in order to connect those two carabiners. The same is with the connection to the harness, and with that small carabiner that you see at the end of the shock absorber part.
How it works
Before the modern “zippered pouch” style (which uses energy-absorbing webbing that progressively rips apart under a load), the KISA plate was the industry standard for decades.
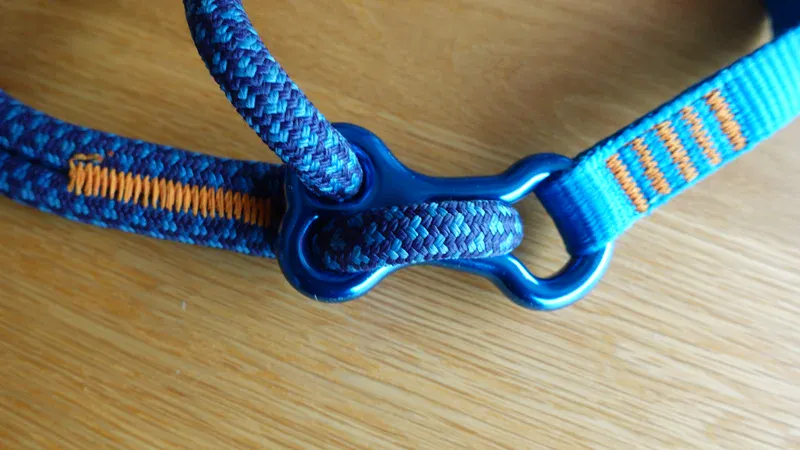
It is a hot-forged aluminum or steel plate shaped like a stylized “8” or a small rectangle with three (or sometimes up to six) threaded holes.
A specific length of dynamic rope is threaded back and forth through these holes, leaving a “tail” hanging out. The total length of this part in my old lanyard is around 90 cm. The length of the two flat lanyards is 66 cm each. The rope is 11 or 12 mm, not completely sure.
The braking action: In a severe fall, the rope is violently pulled through those tight, bending holes. The extreme friction generated by the rope rubbing against the metal plate slows the climber down progressively, acting as the shock absorber.
Why they disappeared from the market: the zippered pouch revolution
My new CAMP lanyard completely hides the mechanism inside a pouch. The same is with PETZL Scorpio, Mammut Skywalker and any other modern Y-rope.
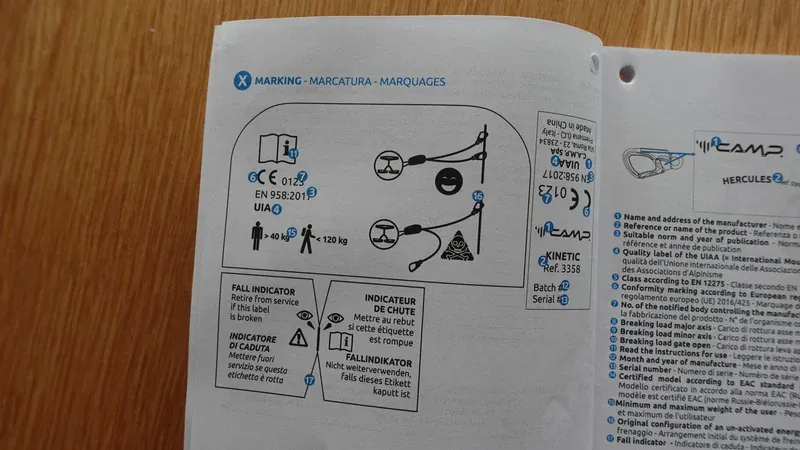
Modern UIAA standards (specifically EN 958:2017) effectively phased out the old friction plates for a few critical reasons:
• Inconsistency with moisture and age: If the rope got wet, frozen, dirty, or stiff over time, the friction dynamics completely changed. The rope could either lock up instantly (causing a catastrophic static fall) or slip too easily.
• The “weight range” problem: Old friction plates were optimized for a standard adult weight (around 80 kg). If a lighter person or child fell, the rope wouldn’t slip at all, resulting in severe internal injuries.
Modern tearing-webbing pouches work reliably across a massive weight range (40 to 120 kg), see the photo below.
• User error: Threading the rope through a friction plate incorrectly (or using the wrong diameter rope) is incredibly easy to do and completely neutralizes the safety mechanism.
The reality of via ferrata fall factors
A ferrata lanyard is not a fancy leash to stop you from sliding. In fact, a fall on a ferrata is actually more violent than a fall in traditional rock climbing.
In rock climbing, you have 30 meters of dynamic rope stretching to absorb your fall. On a via ferrata, if you fall, you slide down a steel cable until your carabiner hits the next metal anchor pin. You instantly drop several meters onto a rigid cable.
Because the lanyard is only about one meter long, the Fall Factor can easily exceed F = 2 or F = 3.
Without a factory-calibrated, modern tearing-webbing pouch, a DIY system or a worn-out old lanyard will either snap entirely, break the carabiners, or transmit enough force to your spine to cause severe internal trauma.
Is it worth making your own ferrata lanyard regarding the price?
I am confident in saying no, it makes no sense. Here are just a few numbers to consider.
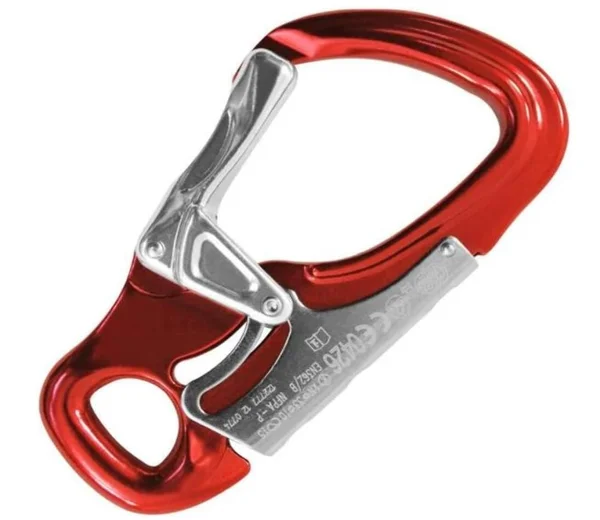
• The lolking carabiner is typically in the range $18-37. The picture below shows the one available on Amazon and its price on the day of writing this text is $36. You need them two. This is Kong Italy Tango Carabiner.
• Then you need the KISA plate which is around $10-12.
•A few dollars more you need to spend on the rope and the small carabiner.
This is more than what I paid for my new CAMP lanyard, the photo below. Though I realized that I was lucky, I paid €80 on Amazon-DE but the price after checking for this text is €96.

Should you buy a second-hand ferrata Y-lanyard?
No, you generally should not buy a second-hand ferrata Y-lanyard (via ferrata set), or at least approach it with extreme caution and only if you can thoroughly verify its history and condition.
These are critical life-safety items designed to absorb the high forces of a fall on exposed via ferrata routes, and the risks of hidden damage or age-related degradation often outweigh the savings.
The shock-absorbing section (stitched webbing or a tearing mechanism in new lanyards) is typically designed for one significant fall. Once deployed (even partially), it must be retired. With those old type as my own lanyard, you can not reliably tell from visual inspection if a previous owner took a hard fall or near-fall.
Aging and material degradation; this topic is discussed in my separate text. Manufacturers recommend retiring sets after 5–10 years depending on use, shorter for frequent or rental use.
UV exposure, abrasion, dirt, and storage conditions weaken webbing over time even without visible damage. Second-hand items often lack a clear usage history or manufacture date.
The previous owner might not disclose drops, overloads, or improper use. Via ferrata involves high fall factors, unlike standard climbing.
When it might be acceptable
From a trusted friend/climber who provides full details (purchase date, usage frequency, any falls, storage conditions) and lets you inspect thoroughly.
Even then, many experts advise against it for via ferrata sets specifically.
Safer alternatives to DIY
If a brand-new €80–€100 lanyard from CAMP, Petzl, or Edelrid is genuinely outside your budget right now, here are budget-friendly options:
Rent the gear locally: Almost every single mountain village, outdoor shop, and valley town in the Dolomites (Cortina, Ortisei, Canazei, Pozza, etc.) rents out complete, certified via ferrata sets (harness, lanyard, and helmet) for around €15 to €25 a day.
So if you are only doing a few routes, renting is a fraction of the cost and guarantees you get perfectly maintained, modern equipment.
Look for entry-level certified models: Brands like Salewa or Climbing Technology sometimes sell basic, entry-level lanyards that meet the exact same strict UIAA safety standards for around €50–€60 on sale.
Extra note: what if you are above the ferrata lanyard weight limit?
That 40–120 kg limit is interesting to discuss. To be clear, that range includes all gear (boots, backpack, water, clothing, and the harness/helmet itself). For a taller or heavily muscled hiker, reaching 120 kg total trailing weight happens surprisingly quickly.
If a climber exceeds 120 kg, it does not mean the lanyard will instantly snap like a piece of string if they fall. The equipment is built with a massive structural safety margin (the overall static strength must be at least 12 – 15 kN).
The real danger is the limits of physics regarding deceleration. So what happens when someone is over 120 kg?
The standard (EN 958:2017) requires the tearing webbing inside the pouch to fully deploy and slow down a 120 kg weight within a maximum braking distance of 2.2 meters, keeping the impact force transferred to the human body below 6 kN (the threshold where severe internal injuries or skeletal fractures begin).
If a hiker weighs, say, 130 kg or 140 kg with gear:
- The webbing bottoms out: In a high-factor fall, the heavy climber’s momentum will easily rip open the entire 2.2 meters of shock-absorbing webbing.
- The static stop: Once the webbing completely runs out, the lanyard becomes a rigid, static rope. The remaining kinetic energy stops instantly.
- Severe force spike: This sudden “hard stop” causes the impact force to spike way past 6 kN. It can rip the anchors out of the rock, break the carabiners, or cause catastrophic internal trauma to the climber.
What should heavier hikers do?
They have two safe, real-world solutions:
1. The short-rope method (the gold standard): This is how mountain guides handle larger clients or children on vertical Dolomite steps.
The heavy climber wears a standard via ferrata set for horizontal or low-angle sections. On steep, vertical, or exposed segments, a partner climbs above them and belays them from above using a dynamic climbing rope and a belay device.
This shifts the fall protection onto a dynamic climbing rope, which has plenty of stretch to handle a larger mass safely.
2. Sourcing industrial/work-at-height equipment: Some heavy climbers bypass commercial sports gear entirely and look toward industrial fall-arrest gear.
Professional rope-access equipment (like the Petzl Absorbica line or Singing Rock industrial absorbers) is strictly governed by industrial standards, where gear is frequently rated for user weights up to 130 kg, 140 kg, or even 150 kg.
The catch: Industrial lanyards are usually heavier, much bulkier, and the carabiners are not optimized for smoothly sliding along a via ferrata cable. It is clunky, but it is physically rated to handle the mass.
So never treat a standard via ferrata lanyard as a “catch-all” safety net. The strategy is:
- either slim down the backpack weight,
- climb routes where you can be top-roped on vertical sections, or
- accept that you must avoid high-fall-risk vertical sections entirely.
Conclusion: play safe
As you have seen from the discussion above, you have all technical information needed to build your own via ferrata lanyard.
However, a via ferrata energy absorber is life-safety equipment, not a DIY project. Modern certified lanyards are the result of extensive testing, strict standards, and controlled manufacturing processes that are virtually impossible to replicate at home.
If you plan on climbing via ferratas in the Dolomites or anywhere else, cutting corners on safety gear is simply not worth the risk. The money saved is insignificant compared to the potential consequences of equipment failure.
My advice is simple: forget the idea of building your own lanyard and invest in a certified one from a reputable manufacturer. It is one of the few pieces of equipment that you should never compromise on.
Thank you for reading. Let me know what you think in the comments section below.
Leave a Reply